Turn Twitch Clips Into TikToks Fast
Turn Twitch clips into TikToks fast: capture live, go vertical, add captions. Then save the edit as a preset so every clip after formats and renders itself.
Quick answer
To turn a Twitch clip into a TikTok, capture the moment live with a hotkey, trim it, reframe to 9:16 vertical, add captions, then export and post. Boltis does this in one app: press a hotkey while live to save the clip, then edit and export free, with no watermark, ready for TikTok and Shorts.
If you are trying to figure out how to turn Twitch clips into TikToks, the biggest mistake is usually waiting until after your stream to do everything. By the time you finish, you are tired, the VOD is long, and even good moments feel like work to find again.
The easier approach is to capture moments live, then turn those clips into vertical TikToks after the stream in a few minutes. Most clips take under 10 minutes from opening the editor to export. That is the workflow this guide covers.
Download Boltis free for Windows and start capturing moments live.
Why do most streamers never turn enough clips into TikToks?
On paper, the process sounds simple. Go live, finish the stream, rewatch the VOD, find a good moment, edit it, crop it to vertical, add captions, then post it.
In practice, that workflow is too heavy to repeat consistently.
Most streamers do not fail because they cannot edit. They fail because the process asks for too much effort after the stream is already over. If every TikTok starts with an hour of VOD scrubbing, you will post less, and when you post less, you get fewer chances to learn what works.
That is why the best way to turn Twitch clips into TikToks is not just “use an editor.” It is to build a workflow that makes clipping and posting easy enough to repeat every week.
What should a good Twitch-to-TikTok workflow do?
If you want this to be sustainable, your workflow should help you do five things:
- Capture the moment while it is happening
- Trim it quickly after the stream
- Format it for 9:16 vertical video
- Add captions and export without over-editing
- Post consistently without waiting for the perfect clip
That sounds basic, but it matters. A lot of creators spend too much time trying to make every clip feel perfect when what they actually need is volume and consistency.
Speed beats overthinking. The clips that tend to perform best are usually 10 to 20 seconds with a clear hook in the first second and basic captions, not overproduced edits with zooms, effects, and ten layers of motion graphics.
Step 1: Capture Twitch clips while you are live
The fastest way to make TikToks from Twitch is to stop relying on memory after the stream.
If something funny, impressive, chaotic, or even slightly entertaining happens, clip it right then. That gives you a shortlist of real moments to work with later instead of forcing you to search through a full VOD.
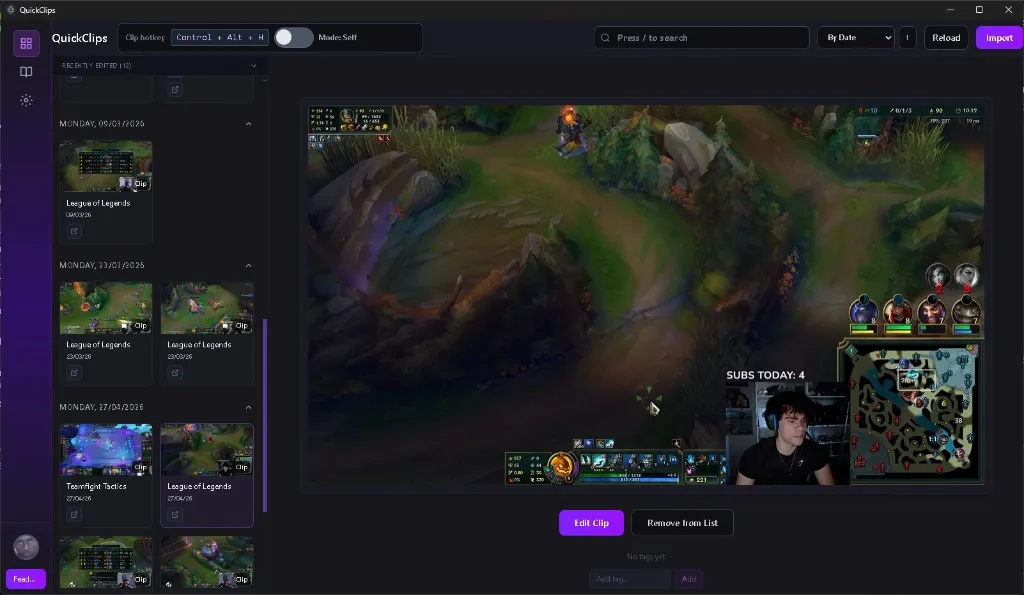
This is also why Boltis is useful here. Boltis is a desktop app that runs alongside your stream, and when you press a hotkey, it tells Twitch to save the last 60 seconds using Twitch’s own clipping system. That means no local recording, no VOD digging, and no background capture eating into your gameplay performance.
A simple rule works well here:
- If the moment made you react, clip it
- If chat reacted, clip it
- If it would make sense out of context in 10 to 20 seconds, clip it
Do not over-filter in the moment. You can decide what is worth posting later.
Step 2: Pick clips that already have a TikTok-friendly shape
Not every Twitch clip becomes a good TikTok.
The clips that usually work best are the ones with:
- A clear reaction in the first second or two
- One obvious payoff, joke, fail, or win
- No long setup needed
- Enough visual clarity to work on a phone screen
- A length you can comfortably trim to roughly 10–25 seconds
If a clip needs too much context, it is harder to make it work on TikTok. The best ones are self-contained. Someone scrolling should understand the clip quickly even if they have never seen your stream before.
This is where a lot of creators overcomplicate things. A “small” moment with a clear hook often performs better than a technically bigger moment that takes 30 seconds to explain.
Step 3: Convert the clip into a vertical TikTok format
If you are editing outside Boltis, you will need the raw file first. Our free Twitch clip downloader takes a public clip or VOD link and gives you the MP4, no account required.
Once you have the clip, the next step is making it look right in 9:16.
That means reframing it so the important parts of the moment still work vertically. Depending on the game and your layout, you may want to prioritize:
- Facecam + gameplay stacked vertically
- Center crop for gameplay-only moments
- Safe zones so TikTok UI does not cover the key action or captions
Boltis gives you three vertical layouts for exactly this: split for when your reaction matters, fullscreen for when the play is the whole point, and a blurred background for wide scenes that break when you crop them.
Boltis already leans into this with its Twitch clip to vertical tool, where you can preview how a Twitch clip will look as a TikTok or Short, adjust the layout, and export a vertical version. Leave some room at the top and bottom of the frame, too, because TikTok’s own buttons and caption bar sit over the video and can cover the exact part of the screen you want people to watch.
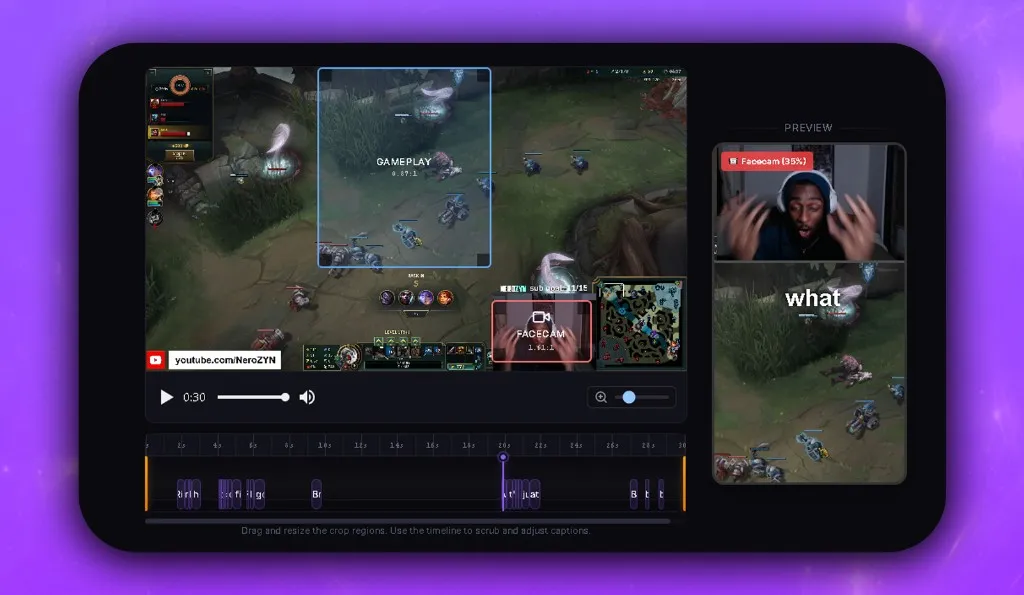
A good rule here is simple: if someone watches the video on mute, on a small screen, for one second, can they still tell where to look?
If the answer is no, the framing needs work.
Step 4: Add captions, but keep the edit simple
A lot of Twitch-to-TikTok clips do not need fancy edits. They need clarity.
Basic captions help because a lot of TikTok views happen with sound low or off. They also help the viewer lock into the moment faster. Boltis generates them for you: auto captions take one click, every word stays editable, and you can export the transcript as an SRT if you would rather finish the video elsewhere. But this does not mean every clip needs zooms, effects, meme cuts, and ten layers of motion graphics.
The edit often takes minutes, not hours. Trim to the best part (Boltis can also suggest cuts for the pauses once captions are on), make sure the start is engaging, add captions, export, and move on.
That is usually the right mindset.
Focus on:
- A strong opening second
- Clean captions
- The shortest version of the moment that still makes sense
- Clear framing
Do not bury a good moment under too much editing.
Step 5: Post more clips, not just “better” clips
The biggest growth mistake most streamers make is treating every TikTok like it needs to be special.
It does not.
You need enough output to learn what gets watched, what gets shared, and what makes someone click into your profile. That only happens if your workflow is light enough to repeat.
Stop asking “How do I make this clip perfect?” and start asking “How do I capture more moments?” That shift leads to more posts, more feedback, and more chances to hit on something that works.
If you want a good companion read, this fits naturally with How to Clip Twitch Highlights Without Scrubbing VODs, because both workflows solve the same problem: the more friction you remove after stream, the more content you actually publish.
A simple workflow you can actually repeat
The whole loop is designed to feel lightweight: capture live, trim and reframe after stream, export, post. No giant edit session, no full VOD review, no trying to remember where the good moment happened two hours later. The more frictionless the workflow feels, the more likely you are to keep posting until you find clips that actually connect.
How do you stop setting this up for every clip?
You have now done it once. If you stream every week, you are about to do it another forty times: the same crop boxes, the same caption style, the same export settings, clip after clip. That repetition is the part that makes streamers quit posting, not the editing itself.
So do the edit once and save it. In Boltis that is a preset, and it holds:
- Your layout (split, fullscreen or blurred), with the facecam and gameplay boxes where you put them
- Your caption style and animation
- Your overlays, like a follow callout or a logo
- Your export settings: resolution, frame rate, quality, and the folder the file goes to
- How much of each clip to keep
The captions themselves still come from each clip, because a preset cannot know what you said. It only knows how you like captions to look.
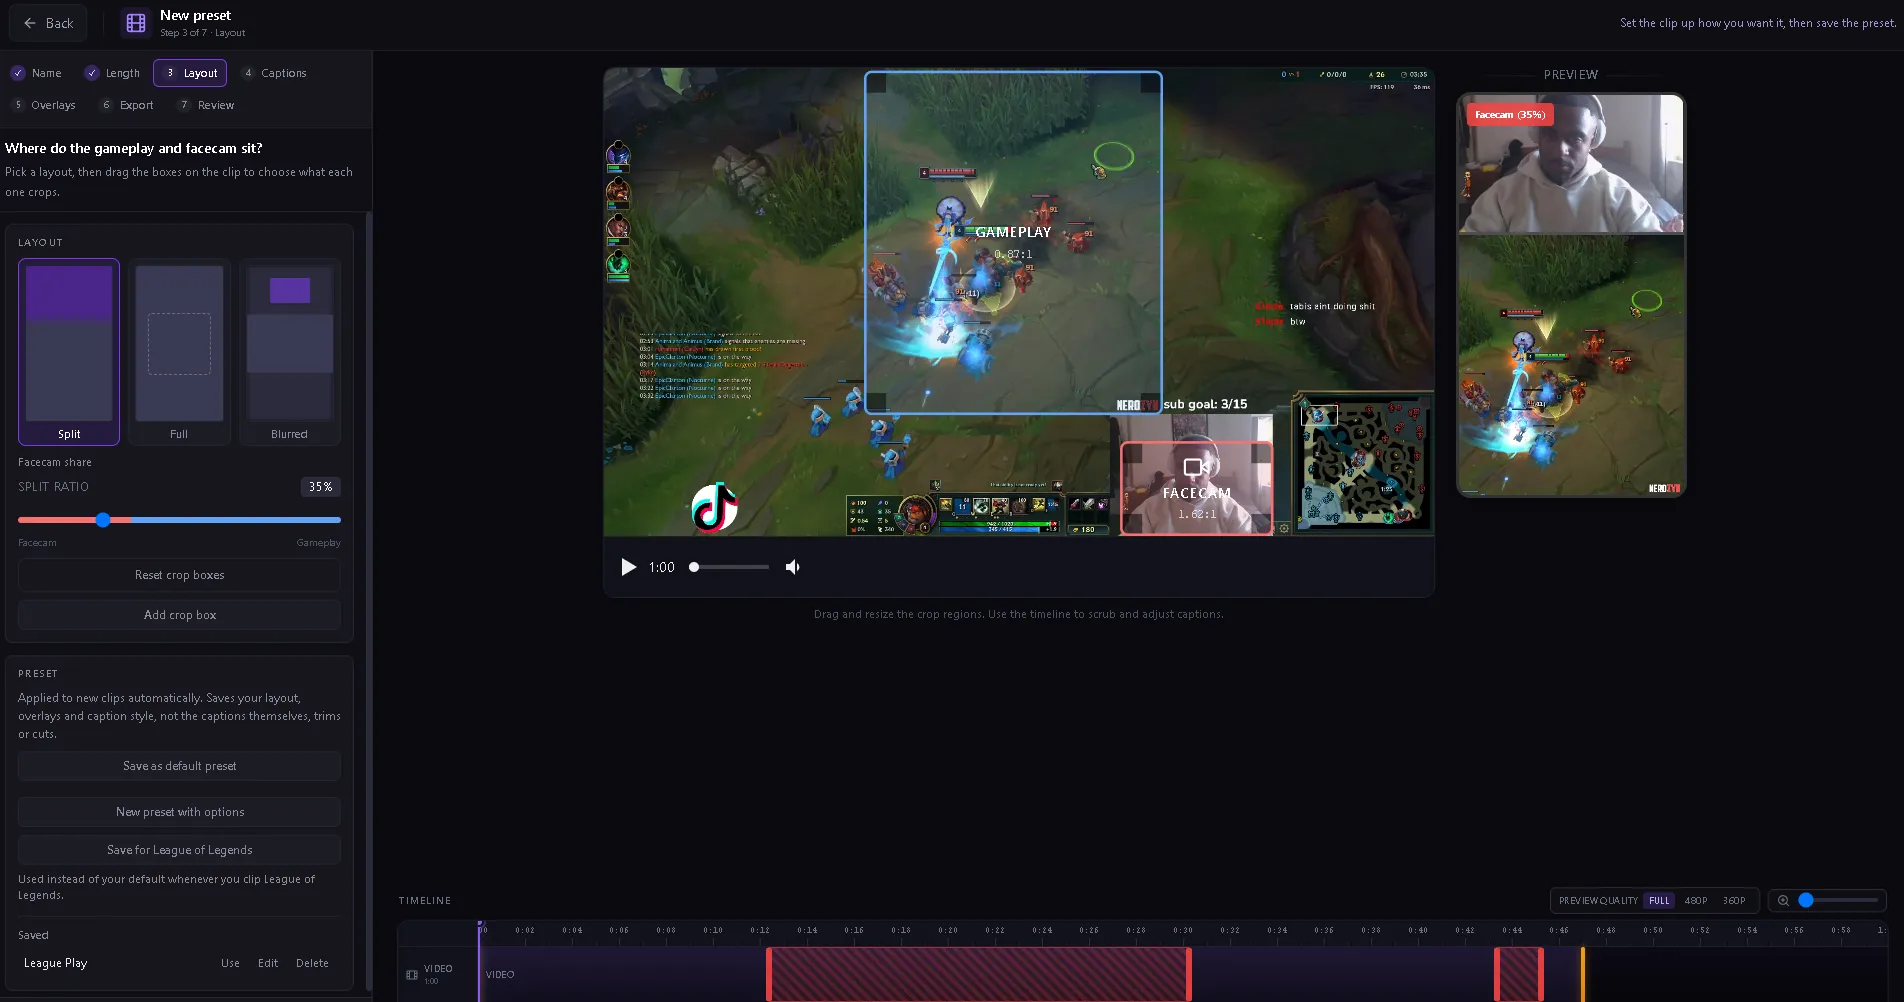
Free includes one preset, and it becomes the default for every clip you open. Premium gives you unlimited presets, and a preset can be tied to a Twitch category, so your Valorant clips and your Just Chatting clips each come out looking right without you choosing.
Download Boltis free, edit one clip the way you like it, and save it as your preset tonight. Every clip after that starts formatted.
Can a clip format itself without opening the editor?
Yes. In Boltis settings, set your hotkey’s action to Clip and queue (or Clip, caption and queue) and pick a preset. Now the key does three things when you press it mid-game: saves the clip to Twitch, formats it with that preset, and puts it in the export queue. Nothing opens, and nothing interrupts your stream.
On Premium you can have more than one hotkey, and each can carry its own preset, clip length and action. That lets you decide what kind of clip it is at the moment it happens, which is exactly when you know:
- One key for a reaction, with a split layout and captions
- Another for a clean mechanical play, fullscreen with no captions
- A third that only saves the clip, for moments you want to edit by hand
Be honest with yourself about where the preset stops, though. A queued clip is rendered with no cuts, because a preset cannot know which seconds are dead air, and a preset’s overlays stay on screen for the whole clip. For most clips that is fine. For the ones where it is not, open the clip, trim it, and export it again.
Does Boltis render clips while you are streaming?
No, and that is on purpose. Rendering a vertical video is real work for your CPU and GPU, and doing it next to your stream encoder would cost you frames. So Boltis never starts a render while you are live. Clips wait in the export queue and render in the background once you stop streaming. If you go live partway through a render, Boltis stops it and puts the clip back in the queue, unless you tell it to let that render finish.
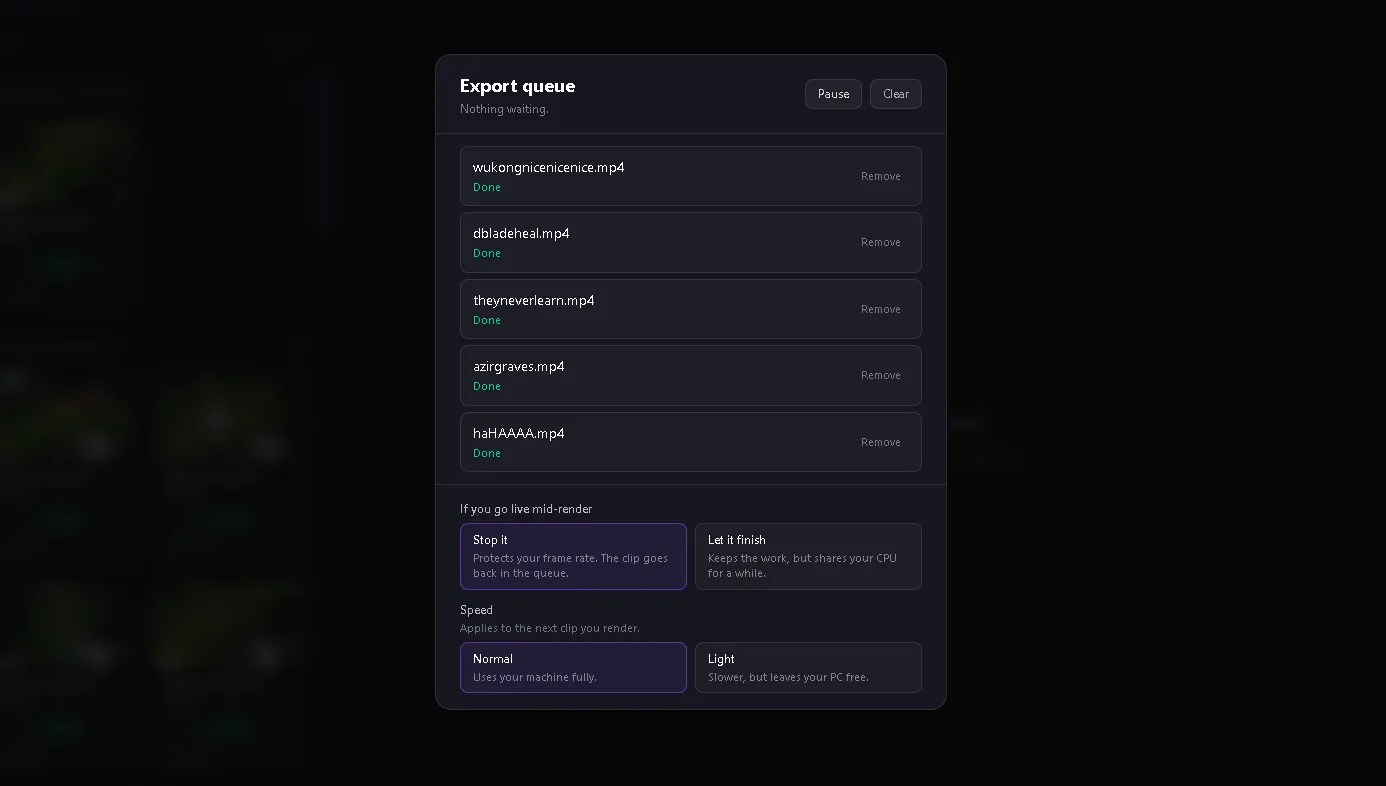
The tradeoff is simple: your clips finish after the stream, not during it. Boltis has to be running for the queue to move (closed to the tray is fine), and there is a Light speed setting if you want your PC free for something else while it works.
Can you export a whole stream’s clips at once?
Yes. Select the clips you have edited in your Boltis library and queue them together. They render one after another in the background, and each file lands in your export folder ready to post.
Only clips you have edited can be batched, because a render needs that clip’s own trims, cuts and captions. Clips you never opened get into the queue a different way: a clip and queue hotkey with a preset.
Here is the part to be clear about: Free holds 2 clips in the queue at a time, counting the one rendering. Finish one and another can go in. If you want to queue a whole stream’s worth in one go, that is Premium.
| Free | Premium | |
|---|---|---|
| Presets | 1, applied to every clip | Unlimited, auto-applied per game |
| Hotkeys | 1 (can clip and queue) | Unlimited, each with its own preset |
| Export queue | 2 clips at a time | No limit |
| Background rendering, never while live | Yes | Yes |
| Captions | 30 a month | Unlimited |
| Post to TikTok and YouTube | Upload the file yourself | One click, or once it renders |
| Watermark | None | None |
On Premium, the last step happens in Boltis too: finished clips go to your TikTok Inbox, or to YouTube with a description and tags, in one click or as soon as they render. Nothing uploads while you are live.
FAQ
How do I turn a Twitch clip into a TikTok?
Capture the clip, trim it, convert it to vertical, add captions, and post it. The hard part is not the edit itself, it is having a workflow that makes this fast enough to repeat consistently.
What aspect ratio should Twitch clips be for TikTok?
TikTok works best in 9:16 vertical format. Uploading a horizontal clip as-is usually feels too small on mobile and wastes screen space.
How long should a Twitch clip be for TikTok?
Most good Twitch-based TikToks land in the 10 to 25 second range. Shorter than 10 seconds rarely gives enough context, and longer than 30 seconds needs a strong mid-hook to hold attention.
Do I need fancy edits to make Twitch clips perform on TikTok?
Usually no. Clear framing, quick pacing, captions, and a strong first second matter more than heavy effects. Over-editing often slows you down more than it helps.
Can Boltis format Twitch clips for TikTok automatically?
Yes. Save your layout, caption style, overlays and export settings as a preset, then set your hotkey to clip and queue. Every clip you capture with that key is formatted with the preset and queued for export, without opening the editor. Free includes one preset.
Can you export a whole stream’s clips at once?
Yes. Select the clips you have edited and queue them together, and they render one after another in the background, never while you are live. Free holds 2 clips in the queue at a time. Premium removes that limit.
Can Boltis post clips to TikTok for me?
Yes, with Premium. Boltis sends a finished clip to your TikTok Inbox in one click, or once it has rendered if you tick TikTok in the stream digest. You then add a sound and caption and post it from the TikTok app. On Free, the workflow ends with a vertical, captioned file you upload yourself.
Is Boltis free to use for turning clips into TikToks?
Yes. Core clipping, editing, and export are free forever, with 30 captions a month. There is no paywall to clip and post.
Does capturing clips with Boltis affect stream FPS?
No. Boltis does not record your screen locally. Clips are created server-side by Twitch using its official clip API, so there is zero FPS impact.
Ready to turn more clips into posts?
If you want to turn Twitch clips into TikToks consistently, the real goal is not just better editing. It is a faster workflow.
You know the moment when it happens. Press one key and keep it, instead of letting an AI guess afterwards. Boltis saves the clip with no FPS impact, formats it with your preset, and renders it after your stream, so you finish streaming to clips ready to post. Boltis is free, has no watermark, and runs on Windows 10 and 11. You do need to be live on Twitch to clip your own stream.
Download Boltis free for Windows and start building a workflow that makes posting easy instead of something you keep putting off. Every feature is on the features page.